How to Fix Standing Water in Yard: Try Simple Fixes First 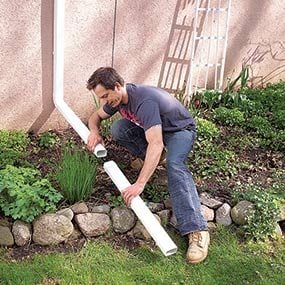 Extend the Downspout: Downspout drainage solutions
Landscaping near the house can create a basin for water. Extending the downspout usually solves the problem.
Before you start digging a trench or taking some other drastic action to get rid of a wet spot or standing water in your yard, step back and survey the situation to see where the water is coming from. The problem could be as simple as a downspout or sump pump discharge that’s draining into a low area of your yard. Redirecting your downspout or running the discharge pipe from your sump pump drainage outside to a different location might be all you need to do.
Draw a Drainage Plan 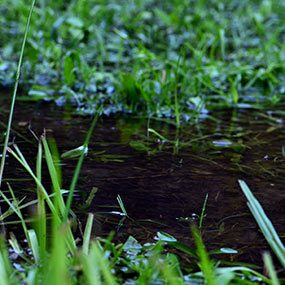 Draw a Drainage Plan
If you couldn’t find a simple fix for your soggy yard dilemma, you’ll need another strategy. Start by making a sketch of your property showing the house, driveway, patios, street and other features. Then use a line level, builder’s level or some other leveling method to determine high and low spots. Draw arrows to show how water flows and make notes to indicate the relative height of high and low spots. Keep in mind that in most cases you shouldn’t plan to direct water onto your neighbor’s property. And if you’re hoping to discharge water into the street or municipal storm sewer, contact the city first to see what regulations apply.
A sketch of standing water in the yard, will help you decide which of the following strategies is best for your situation. For example, if you simply have no way to drain water from a low spot to another location, your best option may be to build a rain garden or dry well.
Construct a Creek Bed 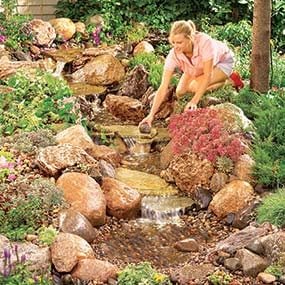 Create a Creek Bed
A creek bed like this can channel water away from a low spot or direct runoff into a rain garden or dry well. With the right landscaping, the creek bed will look good even when it’s dry.
You can solve drainage problems and create an attractive landscape feature at the same time with a dry creek bed. Build a creek bed to direct water away from a low spot in your yard. Or if the slope of the ground permits it, use a creek bed to drain a low spot.
Start by making a swale-essentially a gentle, shallow drainage ditch. Then line it with gravel or stones and add interest with boulders, a bridge or plantings.
Of course, you don’t have to turn your drainage project into a creek bed. A simple swale is an effective and subtle way to control surface water. Obviously, it’s easier to create a swale before you seed or sod your yard, but if necessary, you can cut out the grass with a sod cutter and replace it when you’re done regrading.
Build a Rain Garden 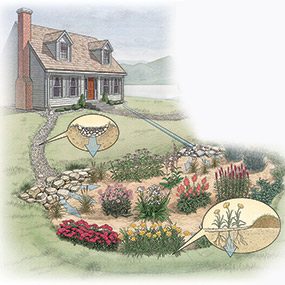 Build a Rain Garden
If you have a low spot in your yard that tends to collect and retain water, consider building a rain garden. A rain garden is simply an area of your yard that’s designed to catch water and is filled with water-loving plants. It doesn’t really solve a soggy yard problem, but a rain garden looks a lot better than a muddy hole. Plus, rain gardens are good for the environment. They reduce runoff and the lawn chemicals, pet waste and sediment that go along with it.
A rain garden doesn’t have to hold water like a pond. You can add drainage and use the rain garden to hold the excess water until it has a chance to drain away. A key part of rain garden design is choosing the right plants for the soil conditions. Typically native plants with deep fibrous roots work well. Learn more about how to build a rain garden in your yard.
Add an Underground Drainage Pipe
One of the best ways to get rid of water from a low spot is to simply drain it away through an underground drainage pipe. For this to work, you need an area to discharge the water that’s lower than the inlet. The underground drainage pipe should slope downhill at least 1/8 in. per foot. If you had a discharge outlet 100 ft. from the inlet, it would have to be about 1 ft. lower.
To create the drain, you’ll have to dig a gradually sloping trench from the source to the outlet. Then bury a plastic catch basin at the source and connect it to the discharge with PVC drainpipe. This system has a few advantages over a French drain (see p. 46). Since the pipe is solid, and not perforated, there’s no need to provide gravel for drainage along the length of the drainpipe. Also, smooth-wall pipe drains water quickly, and if it gets clogged, you can use a drain snake to clean it out.
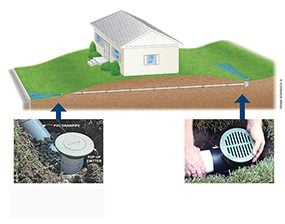 Drainpipe discharge: The discharge end of your drainpipe can be connected to pop up yard drain emitter that sits flush to the lawn when no water is flowing.Drainpipe inlet: Position the inlet catch basin at the low spot of your soggy area. The grate will sit flush to the lawn for easy mowing.
Install a French Drain
A French drain is a versatile system for dealing with all kinds of drainage problems. It disperses water over a large area through a buried perforated pipe. The pipe must be surrounded by material that allows water to drain through. Conventionally this was gravel, but NDS sells a system called EZflow that includes the pipe and surrounding polystyrene aggregate in one convenient and lightweight package. A French drain system can be used alone or combined with a dry well.
A properly designed French drain system does not require an outlet. The water will simply soak into the soil as it flows along the perforated pipe. In fact, a French drain doesn’t require an inlet on just one end either. You can construct the drain to accept water along its length, and disperse it underground.
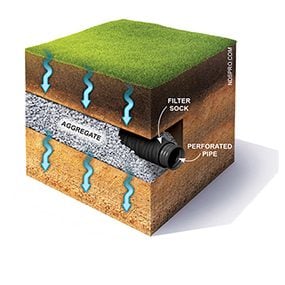 Anatomy of a French Drain: A typical French drain consists of a perforated pipe-usually flexible lightweight plastic-sheathed by a fabric sock to keep dirt and sand from clogging the pipe. The pipe is buried in a trench and surrounded by aggregate. Water enters the pipe, from an inlet at one end, through the earth, or through long narrow grates spaced along its length, and is dispersed through the aggregate and into the ground.
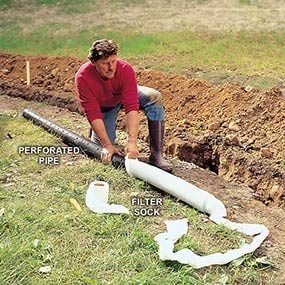 Install the Pipe in a Trench: Connect the lengths of tubing and place them over a bed of gravel. Then add gravel on the sides and over the top before covering the pipe. Perforated drainage pipe is also available with the sock in place.
Create a Dry Well 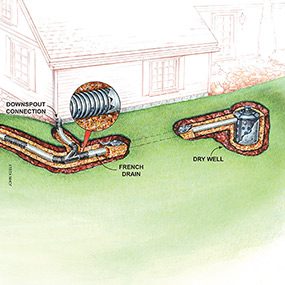 Create a Dry Well
A dry well is simply a large hole filled with gravel or some other aggregate that catches excess water and holds it while it soaks into the ground. You can increase the capacity of a dry well by burying special dry well barrels. These plastic containers collect water and hold it while it drains out through holes in the sides and bottom. The containers must be surrounded by gravel or another porous material to allow drainage. You can stack these plastic dry wells or place them side by side. In general, a dry well should be large enough to collect the first 10 or 15 minutes of a large rainstorm. Websites like ndspro.com provide guidance and calculators to help you determine the size of your dry well. You can also consult with a landscape contractor or soil engineer. You can increase the capacity of a dry well by connecting it to a French drain system. Learn more about curing a wet basement.
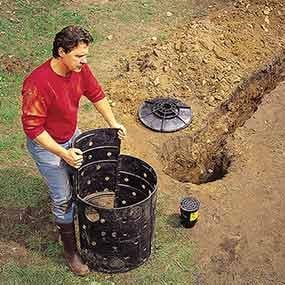
Dry Well
Commercially available dry wells like this are easy to assemble and provide a holding tank for excess runoff water while it drains out the sides and bottom.
Read more: familyhandyman.com


